| 일 | 월 | 화 | 수 | 목 | 금 | 토 |
|---|---|---|---|---|---|---|
| 1 | 2 | 3 | 4 | 5 | 6 | 7 |
| 8 | 9 | 10 | 11 | 12 | 13 | 14 |
| 15 | 16 | 17 | 18 | 19 | 20 | 21 |
| 22 | 23 | 24 | 25 | 26 | 27 | 28 |
- visualvm
- 쇼트유알엘
- 항해99
- 웹개발
- CentOS
- 개인프로젝트
- 카프카
- 생성자 주입
- emqx
- DB
- WEB SOCKET
- Spring
- 데이터베이스
- MYSQL
- docker
- @jsonproperty
- 시큐리티
- java
- 프로그래머스
- EC2
- Spring Security
- Kafka
- 남궁성과 끝까지 간다
- 패스트캠퍼스
- AWS
- 스웨거
- 스파르타코딩클럽
- JavaScript
- JWT
- 스프링의 정석
- Today
- Total
Nellie's Blog
[스파르타코딩클럽] 웹개발 종합반 1주차 정리 본문
👉 웹의 동작 개념 (로컬 개발 환경)

👉 웹의 동작 개념 (배포)

👉 HTML / CSS 기초 - 로그인 페이지 만들기

<!DOCTYPE html>
<html lang="en">
<head>
    <meta charset="UTF-8">
    <meta name="viewport" content="width=device-width, initial-scale=1.0">
    <title>스파르타코딩클럽 | 로그인페이지</title>
    <style>
   	 	.mytitle {
            color: white;
            width: 300px;
            height: 200px;
            background-image: url('https://www.ancient-origins.net/sites/default/files/field/image/Agesilaus-II-cover.jpg');
            background-position: center; //이미지를 가운데로 오게 하기
            background-size: cover; //이미지를 사이즈에 맞게 축소하기

            border-radius: 10px; // 모서리 둥글게
            text-align: center;// 텍스트 가운데 줄맞춤
            padding-top: 40px; // 윗 부분 띄우기
            }
        .wrap {
            margin: 10px auto; // 상하좌우 최대한 미세요! (이미지를 화면 가운데로)
            width: 300px;
            }
    </style>
</head>
<body>
    <div class="wrap">
        <div class="mytitle">
            <h1>로그인 페이지</h1>
            <h5>아이디, 비밀번호를 입력해주세요</h5>
        </div>
        <div>
            <p>
           		ID: <input type="text" />
            </p>
            <p>
           		PW: <input type="password" />
            </p>
        </div>
        <button>로그인하기</button>
    </div>
    </body>
</html>
background-image: url('');
background-position: center;
background-size: cover;
--> 배경넣을때 이 3줄은 항상 같이 다닌다.
👉 구글 웹폰트 입히기
https://fonts.google.com/?subset=korean
Google Fonts
Making the web more beautiful, fast, and open through great typography
fonts.google.com
구글 웹폰트 사이트 접속 -> 마음에 드는 폰트 클릭 -> 우측 하단에 link 태그를 복사해서 head에, CSS를 복사해서 style에 넣기!

<!-- HTML에 이 부분을 추가하고 -->
<link href="https://fonts.googleapis.com/css2?family=Jua&display=swap" rel="stylesheet">

/* CSS에 이 부분을 추가하면 완성! */
* {
font-family: 'Jua', sans-serif;
}
👉 CSS파일분리
<!-- style.css 파일을 같은 폴더에 만들고, head 태그에서 불러오기 -->
<link rel="stylesheet" type="text/css" href = "(css파일이름).css">
<style> ... </style> 을 모두 잘라내고 , CSS파일 생성하여 붙여넣기 -> head에 위와같이 CSS파일 불러오기
👉 부트스트랩(bootstrap) : 예쁜 CSS모음으로 필요할때마다 가져가서 사용하기
https://getbootstrap.com/docs/5.0/components/accordion/
Accordion
Build vertically collapsing accordions in combination with our Collapse JavaScript plugin.
getbootstrap.com
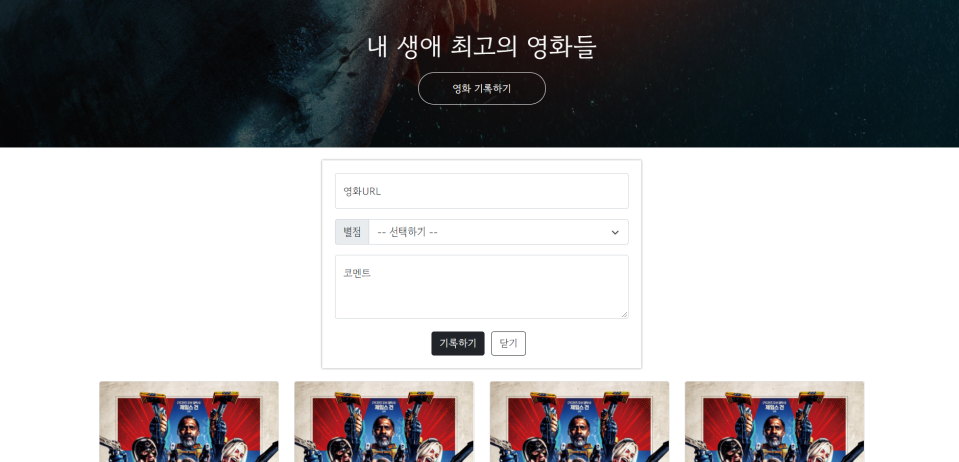
👉 CSS꿀팁 한번더 배우기 - 스파르타피디아 상어배경있는 제목 만들기

<!doctype html>
<html lang="en">
<head>
    <meta charset="utf-8">
    <meta name="viewport" content="width=device-width, initial-scale=1, shrink-to-fit=no">
    <link href="https://cdn.jsdelivr.net/npm/bootstrap@5.0.2/dist/css/bootstrap.min.css" rel="stylesheet"
   		 integrity="sha384-EVSTQN3/azprG1Anm3QDgpJLIm9Nao0Yz1ztcQTwFspd3yD65VohhpuuCOmLASjC" crossorigin="anonymous">
    <script src="https://ajax.googleapis.com/ajax/libs/jquery/3.5.1/jquery.min.js"></script>
    <script src="https://cdn.jsdelivr.net/npm/bootstrap@5.0.2/dist/js/bootstrap.bundle.min.js"
        integrity="sha384-MrcW6ZMFYlzcLA8Nl+NtUVF0sA7MsXsP1UyJoMp4YLEuNSfAP+JcXn/tWtIaxVXM"
        crossorigin="anonymous"></script>

    <title>스파르타 피디아</title>

    <style>
        .mytitle {
            width: 100%;
            height: 250px;
            background-image: linear-gradient(0deg, rgba(0, 0, 0, 0.5), rgba(0, 0, 0, 0.5)), url('https://movie-phinf.pstat
            ic.net/20210715_95/1626338192428gTnJl_JPEG/movie_image.jpg');
            background-position: center;
            background-size: cover;

            color: white;

            display: flex; //내용물을 가운데 정렬!
            flex-direction: column; // 내용물을 세로로 정렬! (가로정렬은 row)
            align-items: center;
            justify-content: center;
            }
        .mytitle > button {
            width: 200px;
            height: 50px;
            background-color: transparent; //버튼 배경 투명하게
            color: white;
            border-radius: 50px;

            border: 1px solid white;
            margin-top: 10px;
            }
        .mytitle > button:hover {    //마우스를 올렸을때(hover) 굵어지게 하기
      		border: 2px solid white;
        }
    </style>
</head>
<body>
    <div class="mytitle">
        <h1>내 생애 최고의 영화들</h1>
        <button>영화 기록하기</button>
    </div>
</body>
</html>
display: flex;
flex-direction: column;
align-items: center;
justify-content: center;
--> 배경에 있는 내용물(?) 을 가운데 정렬할때, 4줄 항상 같이 다닌다!
배경이미지 어둡게 하기 : linear-gradient(0deg, rgba(0, 0, 0, 0.5), rgba(0, 0, 0, 0.5)) ->그냥 복사해서 갖다쓰기
이모티콘 모음 사이트 :
https://kr.piliapp.com/facebook-symbols/
페이스 북 기호 : 웃는 기호, 이모티콘 기호, 이모티콘과 코드 목록
× 이모지 - 이모티콘 혹은 웃는 얼굴이라고도 불립니다. iOS와 Android는 기본적으로 845개의 이모티콘을 지원하고 있으며, 페이스북은 하트/사랑 기호, 별, 부호 및 동물 모양을 포함한 절반을 지원
kr.piliapp.com
👉 스파르타피디아 카드 및 포스팅박스 만들기

<!doctype html>
<html lang="en">
<head>
<meta charset="utf-8">
<meta name="viewport" content="width=device-width, initial-scale=1, shrink-to-fit=no">
<link href="https://cdn.jsdelivr.net/npm/bootstrap@5.0.2/dist/css/bootstrap.min.css" rel="stylesheet"
integrity="sha384-EVSTQN3/azprG1Anm3QDgpJLIm9Nao0Yz1ztcQTwFspd3yD65VohhpuuCOmLASjC" crossorigin="anonymous">
<script src="https://ajax.googleapis.com/ajax/libs/jquery/3.5.1/jquery.min.js"></script>
<script src="https://cdn.jsdelivr.net/npm/bootstrap@5.0.2/dist/js/bootstrap.bundle.min.js"
integrity="sha384-MrcW6ZMFYlzcLA8Nl+NtUVF0sA7MsXsP1UyJoMp4YLEuNSfAP+JcXn/tWtIaxVXM"
crossorigin="anonymous"></script>
<title>스파르타 피디아</title>
<link href="https://fonts.googleapis.com/css2?family=Gowun+Dodum&display=swap" rel="stylesheet">
<style>
* {
font-family: 'Gowun Dodum', sans-serif;
}
.mytitle {
width: 100%;
height: 250px;
background-image: linear-gradient(0deg, rgba(0, 0, 0, 0.5), rgba(0, 0, 0, 0.5)), url('https://movie-phinf.pst
background-position: center;
background-size: cover;
color: white;
display: flex;
flex-direction: column;
align-items: center;
justify-content: center;
}
.mytitle > button {
width: 200px;
height: 50px;
background-color: transparent;
color: white;
border-radius: 50px;
border: 1px solid white;
margin-top: 10px;
}
.mytitle > button:hover {
border: 2px solid white;
}
.mycomment {
color: gray;
}
.mycards {
margin: 20px auto 0px auto;
width: 95%;
max-width: 1200px; //모바일처리
}
.mypost {
width: 95%;
max-width: 500px; //모바일처리
margin: 20px auto 0px auto;
padding: 20px;
box-shadow: 0px 0px 3px 0px gray;
}
.mybtns {
display: flex;
flex-direction: row;
align-items: center;
justify-content: center;
margin-top: 20px;
}
.mybtns > button { //기록하기, 닫기 버튼사이에 간격 띄우기
margin-right: 10px;
}
</style>
</head>
<body>
<div class="mytitle">
<h1>내 생애 최고의 영화들</h1>
<button>영화 기록하기</button>
</div>
<div class="mypost">
<div class="form-floating mb-3">
<input type="email" class="form-control" id="floatingInput" placeholder="name@example.com">
<label for="floatingInput">영화URL</label>
</div>
<div class="input-group mb-3">
<label class="input-group-text" for="inputGroupSelect01">별점</label>
<select class="form-select" id="inputGroupSelect01">
<option selected>-- 선택하기 --</option>
<option value="1">⭐</option>
<option value="2">⭐⭐</option>
<option value="3">⭐⭐⭐</option>
<option value="4">⭐⭐⭐⭐</option>
<option value="5">⭐⭐⭐⭐⭐</option>
</select>
</div>
<div class="form-floating">
<textarea class="form-control" placeholder="Leave a comment here" id="floatingTextarea2"
style="height: 100px"></textarea>
<label for="floatingTextarea2">코멘트</label>
</div>
<div class="mybtns">
<button type="button" class="btn btn-dark">기록하기</button>
<button type="button" class="btn btn-outline-dark">닫기</button>
</div>
</div>
<div class="mycards">
<div class="row row-cols-1 row-cols-md-4 g-4">
<div class="col">
<div class="card h-100">
<img src="https://movie-phinf.pstatic.net/20210728_221/1627440327667GyoYj_JPEG/movie_image.jpg"
class="card-img-top" alt="...">
<div class="card-body">
<h5 class="card-title">영화 제목이 들어갑니다</h5>
<p class="card-text">여기에 영화에 대한 설명이 들어갑니다.</p>
<p>⭐⭐⭐</p>
<p class="mycomment">나의 한줄 평을 씁니다</p>
</div>
</div>
</div>
</div>
</div>
</body>
</html>1. 카드 복사해서 붙여넣기 : Card 카테고리에서 여러개 있는 Card 를 클릭 -> 이미지 넣고, 개수 조절하기 row-cols-md-3 → row-cols-md-4 로 바꾸기
2 . 큰 박스 먼저 만들기 : 그림자 효과: box-shadow: 0px 0px 3px 0px gray; / 안쪽으로 띄우기: padding: 20px;
3. 영화 URL → Forms 의 Floating Labels 참고
4. 별점 박스 → Input group의 Custom forms 참고
5. 코멘트 URL → Forms 의 Floating Labels의 Textareas 참고
6. 기록하기, 닫기 버튼 → Button 두 개를 묶을 div를 만들어 display:flex 주기 (네 줄!) → Buttons 참고
7. 약간의 모바일처리를 해두기. (max-width: 1200px; width:95%; 라고 하면, 최대1200px까지 커질수있지만, 그 전에선 화면의 95%만 차지해줘 )
👉 자바스크립트 - HTML 연결 : 버튼을 클릭하면 경고창이 뜨게하기
1. head의 script안에 함수를 만들어두기
<script>
    function hey(){
    	alert('안녕!');
    }
</script>
2. 버튼에 함수를 연결하기 (버튼을 누르면 함수 호출)
<button onclick="hey()">영화 기록하기</button>개발자도구(F12) -> console 에서 출력해보자. 개발자 도구의 console은 띄워놓은 페이지에서 빠르게 자바스크립트를 테스트해볼 수 있게, 개발자들을 위해 만들어둔 도구.
👉 자바스크립트 - 리스트 : 순서를 지켜서 가지고 있는 형태
let a_list = [] // 리스트를 선언. 변수 이름은 역시 아무렇게나 가능!
// 또는,
let b_list = [1,2,'hey',3] // 로 선언 가능
b_list[1] // 2 를 출력
b_list[2] // 'hey'를 출력
// 리스트에 요소 넣기
b_list.push('헤이')
b_list // [1, 2, "hey", 3, "헤이"] 를 출력
// 리스트의 길이 구하기
b_list.length // 5를 출력
👉 자바스크립트 - 딕셔너리: 키(key)-밸류(value) 값의 묶음
let a_dict = {} // 딕셔너리 선언. 변수 이름은 역시 아무렇게나 가능!
// 또는,
let b_dict = {'name':'Bob','age':21} // 로 선언 가능
b_dict['name'] // 'Bob'을 출력
b_dict['age'] // 21을 출력
b_dict['height'] = 180 // 딕셔너리에 키:밸류 넣기
b_dict // {name: "Bob", age: 21, height: 180}을 출력
[출처] 스파르타코딩클럽 웹개발 종합반 1주차
'회고록 > 항해99' 카테고리의 다른 글
| 프로젝트 서버에 올리기 정리 (0) | 2022.11.04 |
|---|---|
| [스파르타코딩클럽] 웹개발 종합반 5주차 정리 (2) | 2022.09.23 |
| [스파르타코딩클럽] 웹개발 종합반 4주차 정리 (4) | 2022.09.22 |
| [스파르타코딩클럽] 웹개발 종합반 3주차 정리 (4) | 2022.09.21 |
| [스파르타코딩클럽] 웹개발 종합반 2주차 정리 (4) | 2022.09.20 |


