| 일 | 월 | 화 | 수 | 목 | 금 | 토 |
|---|---|---|---|---|---|---|
| 1 | 2 | 3 | 4 | 5 | 6 | 7 |
| 8 | 9 | 10 | 11 | 12 | 13 | 14 |
| 15 | 16 | 17 | 18 | 19 | 20 | 21 |
| 22 | 23 | 24 | 25 | 26 | 27 | 28 |
- 카프카
- docker
- 개인프로젝트
- DB
- AWS
- @jsonproperty
- 데이터베이스
- 시큐리티
- visualvm
- 항해99
- WEB SOCKET
- Spring
- Spring Security
- 스웨거
- EC2
- emqx
- JWT
- 패스트캠퍼스
- 프로그래머스
- CentOS
- Kafka
- java
- 스파르타코딩클럽
- 웹개발
- 생성자 주입
- 남궁성과 끝까지 간다
- JavaScript
- 쇼트유알엘
- MYSQL
- 스프링의 정석
- Today
- Total
Nellie's Blog
[Springboot] 설정값을 주입 받는 방법 3가지 @Value, @ConfigurationProperties(@ConfigurationPerpertiesScan), @ConstructorBinding 본문
[Springboot] 설정값을 주입 받는 방법 3가지 @Value, @ConfigurationProperties(@ConfigurationPerpertiesScan), @ConstructorBinding
Nellie Kim 2024. 10. 9. 15:56사용한 기술 및 버전
- 스프링 부트 : 3.3.1
- 자바 : 17
- IDE : IntelliJ Community
목차
1. 첫 번째 방법 - @Value
1-1) @Value란?
1-2) 실습하기
2. 두 번째 방법 - @ConfigurationProperties (@ConfigurationPerpertiesScan)
2-1) @ConfigurationProperties (@ConfigurationPerpertiesScan) 란?
2-2) 실습하기
3. 세 번째 방법 - @ConfigurationProperties(또는 @ConfigurationPropertiesScan) + @ConstructorBinding → 권장⭐
3-1) @ConstructorBinding란?
3-2) 실습하기
4. 결론
4-1) @Value
4-2) @ConfigurationProperties (@ConfigurationPerpertiesScan)
4-3) @ConfigurationProperties(또는 @ConfigurationPropertiesScan) + @ConstructorBinding
1. 첫 번째 방법 - @Value
1-1) @Value란 ?
사용법이 간단하고 편리해서 많은 개발자가 사용하는 주입 방법이다.
작동 원리는 설정파일의 값을 단순 문자열로 읽은 후, 필드의 타입에 맞게 변환하여 Spring의 의존성 주입(Dependency Injection) 메커니즘을 사용하여 주입한다.
그러나 이 방법은 편리하지만 단점이 많은 방법이다. 가장 큰 단점은 런타임 에러가 발생할 수 있다는 것이다.
@Value는 단순 문자열 바인딩을 수행하기 때문에, 설정 파일에서 잘못된 타입의 값을 주입하더라도 스프링이 즉각적으로 에러를 발생시키지 않는다. 실제 해당 필드를 사용하려는 시점에야 런타임 에러가 발생한다.
또 오작성을 체크해주지 않는다. 설정 파일에서 잘못된 키를 사용했을 경우, @Value는 기본적으로 오류를 발생시키지 않으며, 해당 값이 null로 주입될 수 있다. 예를 들어, 설정 값이 없거나 오타가 있을 때 정확한 에러 메시지를 제공하지 않거나, 단순히 null 값으로 처리될 수 있다.
즉, @Value는 에러를 예방도 어렵고 해결도 어렵다. 정신 건강을 위해 사용을 지양하는 것이 좋다.
1-2) 실습하기
application.properties
person.name=jay
person.job=developer
위의 설정값을 불러와보자.
Person
import lombok.Data;
import org.springframework.beans.factory.annotation.Value;
import org.springframework.stereotype.Component;

@Data
@Component
public class Person {
    @Value("${person.name}")
    private String name;

    @Value("${person.job}")
    private String job;
}
AppRunner
ApplicationRunner 를 구현하여 테스트를 했다.
package com.example.demo.config;

import jakarta.annotation.PostConstruct;
import org.springframework.beans.factory.annotation.Autowired;
import org.springframework.boot.ApplicationArguments;
import org.springframework.boot.ApplicationRunner;
import org.springframework.stereotype.Component;

@Component
public class AppRunner implements ApplicationRunner {
    @Autowired
    Person person;

    @Override
    public void run(ApplicationArguments args) throws Exception {
        System.out.println(person);
    }
}
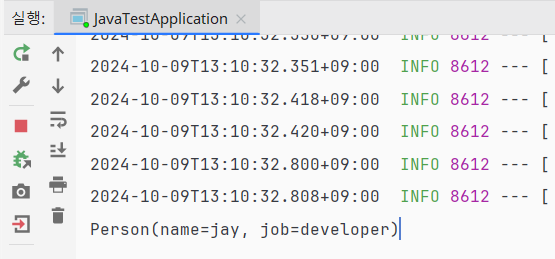
출력 결과

2. 두 번째 방법 - @ConfigurationProperties (@ConfigurationPerpertiesScan)
2-1) @ConfigurationProperties (@ConfigurationPerpertiesScan) 란?
설정파일의 값을 단순 문자열로 읽은 후 필드의 타입에 맞게 변환하는 것은 동일하나, 변환된 값을 리플렉션으로 setter (public) 메서드를 호출하여 주입한다. 그리고 사용할 때는 @EnableConfigurationProperties(Person.class) 를 항상 같이 붙여서 활성화를 시켜야 동작한다.
장점은 런타임 에러를 방지해준다.
@ConfigurationProperties는 클래스와 필드에 대한 타입 안전성을 보장한다. 즉, 설정 값이 잘못된 타입으로 주입될 경우, 애플리케이션이 시작될 때 (스프링 컨텍스트 초기화 시) 에러를 발생시키므로, 개발자가 애플리케이션 시작 시점에 문제를 바로 알 수 있다.
그러나 이 방법도 단점이 있는데, immutable 하지 않다는 점이다.
불변이 아니라는 말이다. setter로 바인딩을 하기 때문에 외부에서 변경될 가능성이 있으며 추후 다른 개발자가 설정값을 변경할 수 있으며 그로 인한 휴먼 에러가 생길 수 있다.
🔍 @ConfigurationProperties
이 어노테이션을 확인해보면, @Component로 등록이 되어 있지 않다. 그 말은, 이 어노테이션을 바라보는 다른 클래스가 빈으로 등록을 해준다는 뜻이다.
//
// Source code recreated from a .class file by IntelliJ IDEA
// (powered by FernFlower decompiler)
//

package org.springframework.boot.context.properties;

import java.lang.annotation.Documented;
import java.lang.annotation.ElementType;
import java.lang.annotation.Retention;
import java.lang.annotation.RetentionPolicy;
import java.lang.annotation.Target;
import org.springframework.core.annotation.AliasFor;
import org.springframework.stereotype.Indexed;

@Target({ElementType.TYPE, ElementType.METHOD})
@Retention(RetentionPolicy.RUNTIME)
@Documented
@Indexed
public @interface ConfigurationProperties {
    @AliasFor("prefix")
    String value() default "";

    @AliasFor("value")
    String prefix() default "";

    boolean ignoreInvalidFields() default false;

    boolean ignoreUnknownFields() default true;
}
🔍 @EnableConfigurationProperties
어떻게 빈으로 등록해줄까? 그 주인공은 @EnableConfigurationProperties 이다. 이 어노테이션을 항상 @ConfigurationProperties와 같이 써야 정상적으로 빈 등록이 잘 되어 설정 파일을 정상적으로 불러올 수 있는 것이다.
//
// Source code recreated from a .class file by IntelliJ IDEA
// (powered by FernFlower decompiler)
//

package org.springframework.boot.context.properties;

import java.lang.annotation.Documented;
import java.lang.annotation.ElementType;
import java.lang.annotation.Retention;
import java.lang.annotation.RetentionPolicy;
import java.lang.annotation.Target;
import org.springframework.context.annotation.Import;

@Target({ElementType.TYPE})
@Retention(RetentionPolicy.RUNTIME)
@Documented
@Import({EnableConfigurationPropertiesRegistrar.class})
public @interface EnableConfigurationProperties {
    String VALIDATOR_BEAN_NAME = "configurationPropertiesValidator";

    Class<?>[] value() default {};
}
@Import({EnableConfigurationPropertiesRegistrar.class}) 부분에서 주입이 일어난다. 자세히 들어가서 살펴보자.
🔍 EnableConfigurationPropertiesRegistrar
이 클래스의 registerBeanDefinitions에서 빈 등록이 일어난다.
ConfigurationPropertiesBeanRegistrar 클래스는 @ConfigurationProperties로 지정된 클래스들을 빈으로 등록한다.
//
// Source code recreated from a .class file by IntelliJ IDEA
// (powered by FernFlower decompiler)
//

package org.springframework.boot.context.properties;

import java.util.Arrays;
import java.util.Objects;
import java.util.Set;
import java.util.stream.Collectors;
import org.springframework.beans.factory.config.BeanDefinition;
import org.springframework.beans.factory.support.BeanDefinitionBuilder;
import org.springframework.beans.factory.support.BeanDefinitionRegistry;
import org.springframework.boot.validation.beanvalidation.MethodValidationExcludeFilter;
import org.springframework.context.annotation.ImportBeanDefinitionRegistrar;
import org.springframework.core.Conventions;
import org.springframework.core.type.AnnotationMetadata;

class EnableConfigurationPropertiesRegistrar implements ImportBeanDefinitionRegistrar {
    private static final String METHOD_VALIDATION_EXCLUDE_FILTER_BEAN_NAME = Conventions.getQualifiedAttributeName(EnableConfigurationPropertiesRegistrar.class, "methodValidationExcludeFilter");

    EnableConfigurationPropertiesRegistrar() {
    }

    // 핵심 코드 ⭐
    public void registerBeanDefinitions(AnnotationMetadata metadata, BeanDefinitionRegistry registry) {
        registerInfrastructureBeans(registry);
        registerMethodValidationExcludeFilter(registry);
        ConfigurationPropertiesBeanRegistrar beanRegistrar = new ConfigurationPropertiesBeanRegistrar(registry); // 핵심 클래스 ⭐
        Set var10000 = this.getTypes(metadata);
        Objects.requireNonNull(beanRegistrar);
        var10000.forEach(beanRegistrar::register);
    }

    private Set<Class<?>> getTypes(AnnotationMetadata metadata) {
        return (Set)metadata.getAnnotations().stream(EnableConfigurationProperties.class).flatMap((annotation) -> {
            return Arrays.stream(annotation.getClassArray("value"));
        }).filter((type) -> {
            return Void.TYPE != type;
        }).collect(Collectors.toSet());
    }

    static void registerInfrastructureBeans(BeanDefinitionRegistry registry) {
        ConfigurationPropertiesBindingPostProcessor.register(registry);
        BoundConfigurationProperties.register(registry);
    }

    static void registerMethodValidationExcludeFilter(BeanDefinitionRegistry registry) {
        if (!registry.containsBeanDefinition(METHOD_VALIDATION_EXCLUDE_FILTER_BEAN_NAME)) {
            BeanDefinition definition = BeanDefinitionBuilder.rootBeanDefinition(MethodValidationExcludeFilter.class, "byAnnotation").addConstructorArgValue(ConfigurationProperties.class).setRole(2).getBeanDefinition();
            registry.registerBeanDefinition(METHOD_VALIDATION_EXCLUDE_FILTER_BEAN_NAME, definition);
        }

    }
}
🔍@ConfigurationPropertiesScan
@ConfigurationPropertiesScan은 클래스를 한꺼번에 매핑할 경우에 사용한다.
메인 클래스에 매번 일일이 클래스를 @EnableConfigurationProperties(Person2.class) 처럼 달아주지 않아도 된다. 패키지 경로만 지정해주면, @ConfigurationProperties이 붙은 모든 클래스를 한번에 매핑을 해준다. 편리한 기능이다.
//
// Source code recreated from a .class file by IntelliJ IDEA
// (powered by FernFlower decompiler)
//

package org.springframework.boot.context.properties;

import java.lang.annotation.Documented;
import java.lang.annotation.ElementType;
import java.lang.annotation.Retention;
import java.lang.annotation.RetentionPolicy;
import java.lang.annotation.Target;
import org.springframework.context.annotation.Import;
import org.springframework.core.annotation.AliasFor;

@Target({ElementType.TYPE})
@Retention(RetentionPolicy.RUNTIME)
@Documented
@Import({ConfigurationPropertiesScanRegistrar.class})
@EnableConfigurationProperties
public @interface ConfigurationPropertiesScan {
    @AliasFor("basePackages")
    String[] value() default {};

    @AliasFor("value")
    String[] basePackages() default {};

    Class<?>[] basePackageClasses() default {};
}
아래의 메인함수에서 @EnableConfigurationProperties 대신 @ConfigurationPropertiesScan(패키지경로) 를 써주면 된다.
package com.example.demo;

import org.springframework.boot.SpringApplication;
import org.springframework.boot.autoconfigure.SpringBootApplication;
import org.springframework.boot.context.properties.ConfigurationPropertiesScan;
import org.springframework.boot.context.properties.EnableConfigurationProperties;

@SpringBootApplication
//@EnableConfigurationProperties(Person2.class) // 이렇게 말고도,
@ConfigurationPropertiesScan("com.example.demo.config") // 이렇게 사용 가능⭐
public class JavaTestApplication {

	public static void main(String[] args) {
		SpringApplication.run(JavaTestApplication.class, args);
	}

}
2-2) 실습하기
메인 클래스
메인 클래스에 @EnableConfigurationProperties(Person2.class)를 붙여줌으로서 Person2 클래스의 @ConfigurationProperties를 인식하고,
setter로 바인딩(클래스의 필드에 직접 접근하지 않고 리플렉션을 사용)하여 빈으로 만들어준다.
package com.example.demo.config;

import com.example.demo.config.Person2;
import org.springframework.boot.SpringApplication;
import org.springframework.boot.autoconfigure.SpringBootApplication;
import org.springframework.boot.context.properties.EnableConfigurationProperties;

@SpringBootApplication
@EnableConfigurationProperties(Person2.class) // 추가⭐
// @ConfigurationPropertiesScan("com.example.demo.config") // 이렇게 해도 된다
public class JavaTestApplication {

	public static void main(String[] args) {
		SpringApplication.run(JavaTestApplication.class, args);
	}
}
Person2
@ConfigurationProperties(prefix = "person") 를 추가해준다.
package com.example.demo.config;

import lombok.Data;
import org.springframework.beans.factory.annotation.Value;
import org.springframework.boot.context.properties.ConfigurationProperties;
import org.springframework.boot.context.properties.EnableConfigurationProperties;
import org.springframework.stereotype.Component;

@Data
@ConfigurationProperties(prefix = "person") // 추가⭐
public class Person2 {

    private String name;
    private String job;
}
AppRunner
package com.example.demo.config;

import jakarta.annotation.PostConstruct;
import org.springframework.beans.factory.annotation.Autowired;
import org.springframework.boot.ApplicationArguments;
import org.springframework.boot.ApplicationRunner;
import org.springframework.stereotype.Component;

@Component
public class AppRunner implements ApplicationRunner {
    @Autowired
    Person2 person2;

    @Override
    public void run(ApplicationArguments args) throws Exception {
        System.out.println(person2);
    }
}
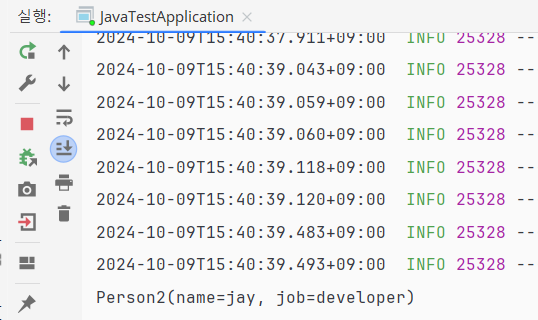
출력 결과

3. 세 번째 방법 - @ConfigurationProperties(또는 @ConfigurationPropertiesScan) + @ConstructorBinding → 권장⭐
3-1) @ConstructorBinding 이란?
@ConfigurationProperties 또는 @ConfigurationPropertiesScan 를 사용하는 것은 빈 생성 후, setter로 주입 받는 방식이었다.
@ConstructorBinding은 설정 값을 생성자 주입으로 처리하는 어노테이션이다. setter 를 거칠 필요가 없기 때문에 불변(immutable) 상태로 안전하게 사용할 수가 있다.
한마디로 빈을 만든 후 설정값을 세팅하는 것이 아니라 생성자를 만들 때 설정 값을 넣고 빈을 만드는 것이다.
주로 application.properties 또는 application.yml에 정의된 값들과 바인딩되지만, 환경 변수, 커맨드 라인 인수, 외부 설정 파일 등 다양한 소스에서도 값을 바인딩할 수 있다.
핵심은 @ConfigurationProperties와 함께 사용해 스프링 컨텍스트에서 값을 바인딩한다는 것이다. (@ConfigurationProperties 없이 @ConstructorBinding만 단독으로 사용할 수는 없다.)
스프링은 바인딩 과정에서 @ConstructorBinding이 적용된 클래스를 만나면 생성자를 통해 주입하는 방식으로 변경하는데,
이 과정은 Binder 클래스와 ConfigurationPropertiesBindingPostProcessor에서 처리된다.
스프링의 Binder 클래스는 @ConstructorBinding이 적용된 클래스를 감지하고 이 때 ConfigurationPropertiesBindConstructorProvider가 생성자 바인딩을 지원하며, 스프링은 리플렉션을 사용해 해당 클래스의 생성자를 탐색하고, 생성자를 통해 주입할 수 있도록 바인딩 방식을 바꾸게 된다.
🔍 @ConstructorBinding
//
// Source code recreated from a .class file by IntelliJ IDEA
// (powered by FernFlower decompiler)
//

package org.springframework.boot.context.properties.bind;

import java.lang.annotation.Documented;
import java.lang.annotation.ElementType;
import java.lang.annotation.Retention;
import java.lang.annotation.RetentionPolicy;
import java.lang.annotation.Target;

@Target({ElementType.CONSTRUCTOR, ElementType.ANNOTATION_TYPE})
@Retention(RetentionPolicy.RUNTIME)
@Documented
public @interface ConstructorBinding {
}
@Target({ElementType.CONSTRUCTOR}) 에서 볼 수 있듯이 생성자 위에 사용해야 한다.
스프링부트 2.x대 버전에서는 클래스 위에서 어노테이션 사용도 가능하다고 한다.
3-2) 실습하기
메인 클래스
메인 클래스에서는
@ConfigurationPropertiesScan("com.example.demo.config") 또는 @EnableConfigurationProperties(Person3.class) 를 붙여준다.
2번 방법과 구조 동일하다.
package com.example.demo;

import org.springframework.boot.SpringApplication;
import org.springframework.boot.autoconfigure.SpringBootApplication;
import org.springframework.boot.context.properties.ConfigurationPropertiesScan;
import org.springframework.boot.context.properties.EnableConfigurationProperties;

@SpringBootApplication
// @ConfigurationPropertiesScan("com.example.demo.config") // 이렇게 해도 되고
@EnableConfigurationProperties(Person3.class) // 또는 이렇게 해도 된다.
public class JavaTestApplication {

	public static void main(String[] args) {
		SpringApplication.run(JavaTestApplication.class, args);
	}
}
Person3
생성자 위에 붙여주어야 하기 때문에, 생성자를 만들어주어야 한다.
생성자를 만들고 그 위에 @ConstructorBinding 을 붙여주면 된다.
import org.springframework.boot.context.properties.ConfigurationProperties;
import org.springframework.boot.context.properties.bind.ConstructorBinding;

@ToString
@ConfigurationProperties(prefix = "person")
public class Person3 {
    private final String name;
    private final String job;

    @ConstructorBinding // 추가⭐
    public Person3(String name, String job){
        this.job = job;
        this.name = name;
    }
}
AppRunner
package com.example.demo.config;

import jakarta.annotation.PostConstruct;
import org.springframework.beans.factory.annotation.Autowired;
import org.springframework.boot.ApplicationArguments;
import org.springframework.boot.ApplicationRunner;
import org.springframework.stereotype.Component;

@Component
public class AppRunner implements ApplicationRunner {
    @Autowired
    Person3 person3;

    @Override
    public void run(ApplicationArguments args) throws Exception {
        System.out.println(person3);
    }
}
출력 결과

4. 결론
4-1) @Value
바인딩 방법
설정파일의 값을 단순 문자열로 읽은 후, 필드의 타입에 맞게 변환하여 Spring의 의존성 주입(Dependency Injection) 메커니즘을 사용
장점
사용법이 간단하고 편리하다.
단점
런타임 에러 발생 가능 : @Value는 단순 문자열 바인딩을 수행하기 때문에, 설정 파일에서 잘못된 타입의 값을 주입하더라도 스프링이 즉각적으로 에러를 발생시키지 않는다. 실제 해당 필드를 사용하려는 시점에야 런타임 에러가 발생한다.
오타에 취약: 설정 파일에서 잘못된 키를 사용했을 경우, @Value는 기본적으로 오류를 발생시키지 않으며, 해당 값이 null로 주입될 수 있다. 예를 들어, 설정 값이 없거나 오타가 있을 때 정확한 에러 메시지를 제공하지 않거나, 단순히 null 값으로 처리될 수 있다.
런타임 에러를 발생시키는 @Value 는 런타임 에러, 휴먼 에러의 발생 가능성이 높으므로 찾기도 어려운 에러가 발생할 수 있다. 사용을 지양하는 것이 좋다.
4-2) @ConfigurationProperties 또는 @ConfigurationPropertiesScan
바인딩 방법
설정파일의 값을 단순 문자열로 읽은 후, 필드의 타입에 맞게 변환하여(위와 동일) 변환된 값을 리플렉션으로 setter 메서드를 호출하여 주입한다.
장점
런타임 에러 방지 : @ConfigurationProperties는 클래스와 필드에 대한 타입 안전성을 보장한다. 즉, 설정 값이 잘못된 타입으로 주입될 경우, 애플리케이션이 시작될 때 (스프링 컨텍스트 초기화 시) 에러를 발생시키므로, 개발자가 애플리케이션 시작 시점에 문제를 바로 알 수 있다.
구체적인 에러 메시지 : 잘못된 설정 값이 주입될 때 구체적인 에러 메시지를 제공한다. 스프링은 설정 값이 클래스의 필드와 일치하지 않거나 바인딩할 수 없는 경우 정확한 경로와 문제를 알려주며 개발자가 명확하게 에러 위치를 파악할 수 있다.
대규모 설정 관리에 유리: @ConfigurationProperties는 복잡하고 대규모 설정 값을 클래스로 관리하기 때문에, 각 설정 값에 대해 더욱 구조화된 방식으로 접근할 수 있다.
단점
immutable 하지 않다 : setter로 바인딩을 하기 때문에 외부에서 변경될 가능성이 있으며 추후 다른 개발자가 설정값을 변경할 수 있으며 그로 인한 휴먼 에러가 생길 수 있다.
4-3) @ConfigurationProperties(또는 @ConfigurationPropertiesScan) + @ConstructorBinding → 권장⭐
바인딩 방법
설정파일의 값을 단순 문자열로 읽은 후, 필드의 타입에 맞게 변환(동일)하고 리플렉션을 사용해 생성자를 호출하여 주입한다.
장점
불변성(Immutable): @ConstructorBinding을 사용하면 설정 값이 생성자를 통해 주입되므로, 이후 해당 객체의 필드는 변경될 수 없다. 불변 객체로 만들 수 있어 동시성 문제를 피하고, 설정 값이 의도치 않게 변경되는 것을 방지할 수 있다.
휴먼 에러 방지 : setter가 없으므로 코드의 복잡성이 줄어들고, 외부에서 값이 임의로 수정되는 휴먼 에러 가능성이 낮다.
단점
구현 복잡성: @ConstructorBinding을 사용하기 위해 추가적인 어노테이션(@EnableConfigurationProperties 또는 @ConfigurationPropertiesScan)을 사용해야 한다.
진짜 결론
@ConstructorBinding 를 적극 활용하자!~!


