
Notice
Recent Posts
Recent Comments
Link
| 일 | 월 | 화 | 수 | 목 | 금 | 토 |
|---|---|---|---|---|---|---|
| 1 | 2 | 3 | 4 | |||
| 5 | 6 | 7 | 8 | 9 | 10 | 11 |
| 12 | 13 | 14 | 15 | 16 | 17 | 18 |
| 19 | 20 | 21 | 22 | 23 | 24 | 25 |
| 26 | 27 | 28 | 29 | 30 | 31 |
Tags
- CentOS
- visualvm
- 항해99
- WEB SOCKET
- 스파르타코딩클럽
- JavaScript
- 개인프로젝트
- DB
- java
- EC2
- 웹개발
- 데이터베이스
- 시큐리티
- emqx
- 카프카
- @jsonproperty
- docker
- 스프링의 정석
- JWT
- 쇼트유알엘
- 패스트캠퍼스
- Spring
- MYSQL
- 스웨거
- Kafka
- 생성자 주입
- 프로그래머스
- 남궁성과 끝까지 간다
- AWS
- Spring Security
Archives
- Today
- Total
Nellie's Blog
스프링부트 로컬에서 이미지 불러오기 본문
728x90
http://antananarivo.tistory.com/63
스프링, 로컬에서 이미지 불러오기 최종.
일주일을 해맸다. 정확히 말하면 5일.결론을 얻은것 같았는데 다시 원점으로 돌아오기를 반복... 그래도 결국 답을 찾아냈다.(스프링 버젼은 4.3, jdk는 1.8, tomcat은 8.0 버젼을 사용중임) 방법은 크
antananarivo.tistory.com
3가지 클래스만 수정해주면 된다.
1. HomeController
@RequiredArgsConstructor
@Controller
@Slf4j
@CrossOrigin
public class HomeController {
    private final UserService userService;
    private final HomeMapper homeMapper;
    private final AuthenticationManager authenticationManager;
    @Autowired
    private UserDetailsService userDetailsService;
    private UserDto user;

    // 1. 회원가입 화면
    @GetMapping("/register")
    public String signupForm() {
        return "register";
    }

    // 2. 회원가입
    @PostMapping("/register")
    @ResponseBody
    public UserDto signup(@RequestBody UserDto userDto) throws UserException, IOException {
        return userService.signUp(userDto);
    }

    // 프로필 사진 업로드
    @PostMapping("/upload-profilePicture")
    public ResponseEntity<String> uploadProfilePicture(@RequestParam("uploadFile") MultipartFile profilePicture,
                                                       @RequestParam("username") String username) throws IOException {
        // 내가 업로드 파일을 저장할 경로
        String originalName = profilePicture.getOriginalFilename();
        String fileName = System.currentTimeMillis() + "_" + originalName;


        // 업로드 할 디렉토리 경로 설정
        String savePath = "C:\\Program Files\\hj\\first_project\\profile_picture";
        // 저장할 파일, 생성자로 경로와 이름을 지정해줌.
        File saveFile = new File(savePath, fileName);

        userService.storeProfilePicture(profilePicture, fileName, username, originalName);

        try {
            // void transferTo(File dest) throws IOException 업로드한 파일 데이터를 지정한 파일에 저장
            profilePicture.transferTo(saveFile);
            return ResponseEntity.ok("파일 업로드 성공");
        } catch (IOException e) {
            e.printStackTrace();
            // 파일 업로드 실패 처리를 여기에 추가할 수 있습니다.
            return ResponseEntity.status(HttpStatus.INTERNAL_SERVER_ERROR).body("파일 업로드 실패");
        }
    }
2. register.jsp
<%@ page language="java" contentType="text/html; charset=UTF-8" pageEncoding="UTF-8"%>
<!DOCTYPE html>
<html lang="ko">
<head>
<meta charset="UTF-8">
<meta http-equiv="X-UA-Compatible" content="IE=edge">
<meta name="viewport" content="width=device-width, initial-scale=1.0">
<title>회원가입 화면</title>
<!-- Bootstrap CSS -->
<link rel="stylesheet" href="https://stackpath.bootstrapcdn.com/bootstrap/4.3.1/css/bootstrap.min.css"
integrity="sha384-ggOyR0iXCbMQv3Xipma34MD+dH/1fQ784/j6cY/iJTQUOhcWr7x9JvoRxT2MZw1T" crossorigin="anonymous">
<style>
....
</style>
</head>
<body>
<div class="container">
<div class="input-form-backgroud row">
<div class="input-form col-md-12 mx-auto">
<h4 class="mb-3">회원가입</h4>
<%-- <form method="post">--%>
<form class="validation-form" novalidate onsubmit="return register();">
<div class="row">
<div class="col-md-6 mb-3">
<label for="name">이름</label>
<input type="text" class="form-control" id="name" placeholder="홍길동" value="" required>
<span id="nameError" style="color: red;"></span>
</div>
<div class="col-md-6 mb-3">
<label for="nickname">별명</label>
<input type="text" class="form-control" id="nickname" placeholder="별명" value="" required>
<span id="nicknameError" style="color: red;"></span>
</div>
</div>
<!-- 주소 입력 버튼 -->
<div class="mb-3">
<!-- 함수명이랑 id값이랑 같아서 계속 에러났었음.... -->
<button class="btn btn-primary" type="button" id="findAddress" onclick="findAddr()">주소 입력</button>
</div>
<div class="form-group">
<label for="zipcode">우편번호</label>
<input type="text" name="zipcode" id="zipcode" class="form-control" placeholder="우편번호를 입력하세요" readonly onclick="findAddr()">
</div>
<div class="form-group">
<label for="streetAdr">도로명 주소</label>
<input type="text" name="streetAdr" id="streetAdr" class="form-control" placeholder="도로명 주소를 입력하세요" readonly>
</div>
<div class="form-group">
<label for="detailAdr">상세주소</label>
<input type="text" name="detailAdr" id="detailAdr" class="form-control" placeholder="상세주소를 입력하세요">
</div>
<div class="mb-3">
<label for="username">이메일</label>
<%-- 인증하기 버튼을 누르면 작성한 email이 사라지는 것을 방지하기 위해 readonly 추가 --%>
<input type="email" class="form-control" id="username" placeholder="weaver123@example.com" required >
<span id="usernameError" style="color: red;"></span>
</div>
<!-- 이메일 인증 버튼 추가 -->
<div class="mb-3">
<button class="btn btn-primary" type="button" id="emailVerificationButton" onclick="sendEmailVerification()">인증</button>
</div>
<!-- 인증번호 입력 칸 (숨겨진 상태로 시작) -->
<div class="mb-3" id="verificationCodeDiv" style="display: none;">
<label for="authNumber">인증번호</label>
<input type="text" class="form-control" id="authNumber" placeholder="인증번호를 입력하세요" required>
<div class="invalid-feedback">
인증번호를 입력해주세요.
</div>
</div>
<div class="mb-3">
<label for="password">비밀번호</label>
<input type="password" class="form-control" id="password" placeholder="비밀번호는 8~16자 영문, 숫자, 특수문자를 사용하세요" required>
<span id="passwordError" style="color: red;"></span>
</div>
<div class="mb-3">
<label for="passwordConfirm">비밀번호 확인</label>
<input type="password" class="form-control" id="passwordConfirm" placeholder="비밀번호를 다시 입력해주세요" required>
<span id="passwordConfirmError" style="color: red;"></span>
</div>
<div class="mb-3">
<label for="phoneNumber">휴대폰 번호</label>
<input type="text" class="form-control" id="phoneNumber" placeholder="휴대폰번호를 입력해주세요" required>
<span id="phoneNumberError" style="color: red;"></span>
</div>
<div class="mb-3">
<label for="profilePicture">프로필 사진</label>
<input type="file" class="form-control-file" id="profilePicture" name="uploadFile" accept=".jpg, .jpeg, .png">
<div class="invalid-feedback">
이미지 파일을 업로드해주세요.
</div>
</div>
<div class="mb-4"></div>
<button class="btn btn-primary btn-lg btn-block" type="button" id="registrationForm" onclick="register(); storeProfilePicture()">가입 완료</button>
</form>
</div>
</div>
<footer class="my-3 text-center text-small">
<p class="mb-1">© 2021 YD</p>
</footer>
</div>
<script src="https://code.jquery.com/jquery-3.6.0.min.js"></script>
<script src="//t1.daumcdn.net/mapjsapi/bundle/postcode/prod/postcode.v2.js"></script>
<script>
// 3. 가져온 정보를 data로 묶기
let fileInput = $("input[name=uploadFile]")[0];
let fileObj = fileInput.files[0];
let data = {
"name" : name,
"nickname" : nickname,
"username" : username,
"password" : password,
"passwordConfirm" : passwordConfirm,
"phoneNumber" : phoneNumber,
"profilePicture" : profilePicture,
"zipcode" : zipcode,
"streetAdr" : streetAdr,
"detailAdr" : detailAdr,
"authNumber" : authNumber
}
if (fileObj) {
let formData = new FormData();
formData.append("uploadFile", fileObj);
console.log("fileObj: " + fileObj);
console.log("fileObj.name: " + fileObj.name);
console.log("fileObj.size: " + fileObj.size);
console.log("fileObj.type: " + fileObj.type);
$.ajax({
url: '/upload-profilePicture',
processData: false,
contentType: false,
data: formData,
type: 'POST',
// dataType: 'json',
success: function (response) {
console.log(response);
// 파일 업로드 성공 처리를 추가할 수 있습니다.
},
error: function (xhr, status, error) {
console.log(xhr);
console.log(status);
console.log(error);
// 파일 업로드 실패 처리를 추가할 수 있습니다.
}
});
}
// 4. 클라에서 가져온 데이터를 서버로 전송 (이 예시에서는 URL이 '/register'로 가정)
$.ajax({
type: 'POST',
url: '/register', // 가입완료 버튼을 누르면 이 URL로 매핑!!! 마지막에 가는게xx
// 사용자가 입력한 정보들이 위에 변수로 수집되고, 그 정보는 아래의 data라는 객체에 저장된다.
// 이 객체는 json 데이터형식을 가지며, 각 입력필드의 값을 해당 필드의 이름으로 매핑한다!!
// 이 요청은 /register url로 보내지며, 서버의 컨트롤러 중에 @PostMappling("/register")가 달린 메소드가 호출된다.
// 이 메서드는 json형식의 데이터인 'userDto' 객체를 파라미터로 받는다.
data: JSON.stringify(data),
contentType: 'application/json', // JSON 형식의 데이터를 전송
success: function (response, status, xhr) { // response 객체에 success, msg가 json형식으로 존재함(컨트롤러에서 반환한 값이 json으로 들어옴)
console.log(response); //응답 body부 데이터
console.log(status); //"succes"로 고정인듯함
console.log(xhr);
if (xhr.status === 200) {
// 서버 응답의 상태 코드가 200일 때만 실행
alert('가입이 완료되었습니다!');
location.href = "/login";
} else {
// 가입 실패 처리
alert('서버에서 오류가 발생했습니다.');
}
},
error: function (response, status, xhr) {
// 서버 요청 실패 시 실행
console.log('실패했다...')
console.log(response); //응답 body부 데이터
alert('서버 요청 실패');
}
});
return true;
// // 5. 모든 필드가 유효한 경우 폼을 서버로 제출할 수 있습니다.
// if (isValid) {
// $("#registrationForm")[0].submit();
// }
}
// 파일 업로드 메소드
function storeProfilePicture() {
let fileInput = $("input[name=uploadFile]")[0];
let fileObj = fileInput.files[0];
var username = $('#username').val()
if (fileObj) {
let formData = new FormData();
formData.append("uploadFile", fileObj);
formData.append("username", username);
console.log("fileObj: " + fileObj);
console.log("fileObj.name: " + fileObj.name);
console.log("fileObj.size: " + fileObj.size);
console.log("fileObj.type: " + fileObj.type);
$.ajax({
url: '/upload-profilePicture',
processData: false,
contentType: false,
data: formData,
type: 'POST',
// dataType: 'json',
success: function (response) {
console.log(response);
// 파일 업로드 성공 처리를 추가할 수 있습니다.
},
error: function (xhr, status, error) {
console.log(xhr);
console.log(status);
console.log(error);
// 파일 업로드 실패 처리를 추가할 수 있습니다.
}
});
}
}
// 파일 업로드 버튼(input[type=file])에 change 이벤트 핸들러 등록
$("input[type=file]").on("change", storeProfilePicture);
</script>
</body>
</html>2. MyPageController
@RequiredArgsConstructor
@Controller
@Slf4j
@CrossOrigin
public class MypageController {
    private final UserService userService;
    private final HomeMapper homeMapper;

    // 마이페이지 화면
    @GetMapping("/mypage")
    public ModelAndView mypage(Model model) {
        // 현재 사용자의 인증 정보 가져오기
        Authentication authentication = SecurityContextHolder.getContext().getAuthentication();
        System.out.println("마이페이지 - authentication = " + authentication);

        // 사용자 이름 가져오기
        String username = authentication.getName();
        UserDto userDto = homeMapper.findByUsername(username);

        // 프로필 사진 경로 가져와서 저장하기
        String profilePictureSavePath = homeMapper.findProfilePictureSavePath(username);// 왜 여기서 못가져오지?

        System.out.println("마이페이지 컨트롤러 / 화면 - profilePictureSavePath =  " + profilePictureSavePath);
        userDto.setProfilePictureLocation(profilePictureSavePath);

        Map<String, Object> params = new HashMap<>();
        params.put("savePath", profilePictureSavePath);
        params.put("userDto", userDto);


        homeMapper.updateUserInsertSavePath(params);


        //solution /img/ 아래 쓰고싶은 파일 이름만 적어줍니다.
        File file = new File("/img/test.jpg");
        ModelAndView mv = new ModelAndView();
        mv.setViewName("mypage");
        mv.addObject("file", file);
        mv.addObject("user", userDto);
        return mv;
    }
}
아래 코드를 추가해주기
//solution /img/ 아래 쓰고싶은 파일 이름만 적어줍니다.
File file = new File("/img/test.jpg");
ModelAndView mv = new ModelAndView();
mv.setViewName("mypage");
mv.addObject("file", file);
mv.addObject("user", userDto);
return mv;
3. WebConfig 추가
@Configuration
public class WebConfig implements WebMvcConfigurer{

    //file path의 정적리소스 사용을 가능하게 해줍니다.
     @Override
    public void addResourceHandlers(ResourceHandlerRegistry registry) {
        //solution localhost:8080/img/~ 이렇게 들어오면 아래에서 등록한 filePath에서 정적 리소스를 찾아 리턴해줍니다.
        ResourceHandlerRegistration reg1 = registry.addResourceHandler("img/**");

       //solution 이미지가 있는 파일 경로를 등록해줍니다.
        reg1.addResourceLocations("file:C:\\Users\\weaver-gram-002\\"); // 윈도우에서의 형식!
    }
}
맥과 윈도우의 경로가 다르니 주의하자. 지금 적은 경로는 윈도우 방식이다.
이 경로에 저장되어 있던 test.jpg 파일을 불러와보도록 하겠다.

4. SecurityConfig
이미지 경로를 화이트리스트로 등록하여 시큐리티에 걸리지 않도록 하기
@Configuration
@RequiredArgsConstructor
@EnableWebSecurity
public class  SecurityConfig extends WebSecurityConfigurerAdapter {
    private final AuthenticationEntryPoint authenticationEntryPoint;

    private static final String[] AUTH_WHITE_LIST = {
            "/configuration/ui",
            "/configuration/security",
            "/webjars/**",
            "/h2/**",
            "/h2-console/**",
            "/css/**",
            "/js/**",
            "/scss/**",
            "/vendor/**",
            "/img/**", //solution 이미지 경로는 화이트리스트로 등록합니다.
//            "/boards/**",
            "/store-img/**"
    };


    @Bean
    public BCryptPasswordEncoder encodePassword(){
        return new BCryptPasswordEncoder();
    }


    @Bean
    @Override
    public AuthenticationManager authenticationManagerBean() throws Exception{
        return super.authenticationManagerBean();
    }


    @Override
    public void configure(WebSecurity web) throws Exception {
        web.ignoring().antMatchers(AUTH_WHITE_LIST);
    }

    @Override
    protected void configure(HttpSecurity http) throws Exception {
        http.
                csrf().disable().
                authorizeRequests()
                .antMatchers("/**").permitAll()
                .anyRequest().authenticated()
                .and()
                .exceptionHandling()
                .authenticationEntryPoint(authenticationEntryPoint);

    }
}
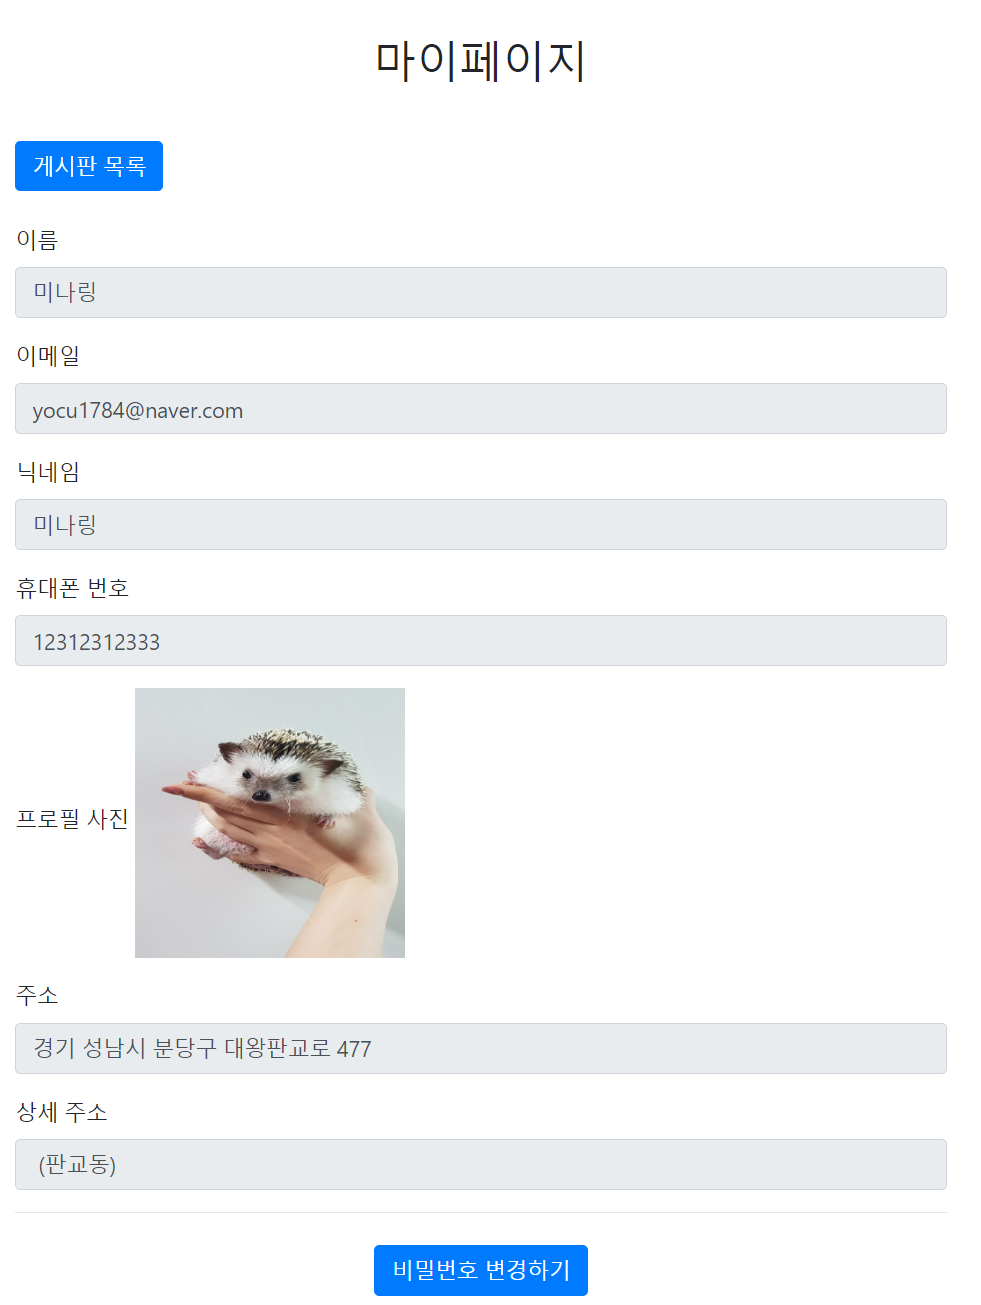
5. mypage.jsp
<%@ page language="java" contentType="text/html; charset=UTF-8" pageEncoding="UTF-8"%>
<%@ taglib prefix="c" uri="http://java.sun.com/jsp/jstl/core"%>
<%@taglib uri="http://www.springframework.org/tags" prefix="spring"%>
<!DOCTYPE html>
<html lang="ko">
<head>
<meta charset="UTF-8">
<meta http-equiv="X-UA-Compatible" content="IE=edge">
<meta name="viewport" content="width=device-width, initial-scale=1.0">
<title>마이페이지 화면</title>
<!-- Bootstrap CSS -->
<link rel="stylesheet" href="https://stackpath.bootstrapcdn.com/bootstrap/4.3.1/css/bootstrap.min.css"
integrity="sha384-ggOyR0iXCbMQv3Xipma34MD+dH/1fQ784/j6cY/iJTQUOhcWr7x9JvoRxT2MZw1T" crossorigin="anonymous">
<style>
.center-title {
text-align: center;
}
</style>
</head>
<body>
<div class="container mt-5">
<h2 class="text-center mb-4">마이페이지</h2>
<a href="/boards" class="btn btn-primary mt-3">게시판 목록</a>
<br>
<br>
<div class="input-form-backgroud row">
<div class="input-form col-md-12 mx-auto">
<form class="validation-form" action="/login" method="post" novalidate>
<div class="mb-3">
<label for="name">이름</label>
<input type="text" class="form-control" id="name" name="name" value="${user.name}" readonly>
</div>
<div class="mb-3">
<label for="username">이메일</label>
<input type="email" class="form-control" id="username" name="email" value="${user.username}" readonly>
</div>
<div class="mb-3">
<label for="nickname">닉네임</label>
<input type="text" class="form-control" id="nickname" name="nickname" value="${user.nickname}" readonly>
</div>
<div class="mb-3">
<label for="phoneNumber">휴대폰 번호</label>
<input type="text" class="form-control" id="phoneNumber" name="phoneNumber" value="${user.phoneNumber}" readonly>
</div>
<div class="mb-3">
<label for="profilePicture">프로필 사진</label>
</div>
<img src="${file}" alt="프로필 사진" height="200" id="profilePicture"/>
<div class="mb-3">
<label for="streetAdr">주소</label>
<input type="text" class="form-control" id="streetAdr" name="streetAdr" value="${user.streetAdr}" readonly>
</div>
<div class="mb-3">
<label for="detailAdr">상세 주소</label>
<input type="text" class="form-control" id="detailAdr" name="detailAdr" value="${user.detailAdr}" readonly>
</div>
<hr class="mb-4">
<div class="text-center">
<a class="btn btn-primary" href="/change-password">비밀번호 변경하기</a>
</div>
</form>
</div>
</div>
<footer class="my-3 text-center text-small">
<p class="mb-1">© 2021 Your Company</p>
</footer>
</div>
<!-- 필요한 스크립트와 스타일을 추가하려면 head 부분에 추가합니다. -->
<script src="https://code.jquery.com/jquery-3.6.0.min.js"></script>
<script>
</script>
</body>
</html>
잘 불러와진다!!!
'Back-end > java' 카테고리의 다른 글
'Back-end/java' Related Articles
more
